Vi copio questo articolo che ho trovato in un forum fantastico:
Tech Article Title Author Date
Home Guide to Wheel Scuff Repair NASA Racer 2002
http://www.audiworld.com/tech/ext43.shtml
Note that although this is a Porsche painted wheel, the WURTH wheel paint (silver) is used for ALL German painted wheels. Same techniques apply for an S4:
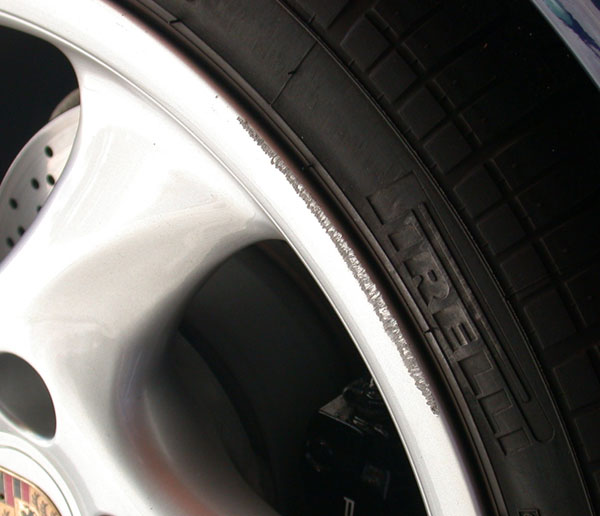
Well, there I was...backing into a parking space against a curb and I was in a hurry and I heard it...SCRAPE! One fraction of a second...barely moving. Got out and looked at the rim...OOOOOOWWWWW!
Well, no need to fear...I've done this enough times to have a easy way to do home repairs with a few simple items. Note that this ONLY covers light scuffs, this isn't meant to be used to repair a DAMAGED wheel or one where the scuffs cause significant damage to the rim. This is only for those annoying superficial scuffs like happened to me more times than I care to admit. Now there are PLENTY of GOOD services which can do this for VERY reasonable money...most folks will happily do this but I'm inpatient and have the free time (generally) to spend a couple of hours doing this and it REALLY takes the edge off donking my wheels when I know I can simply fix it myself.
So if you are interested...here's what you need:
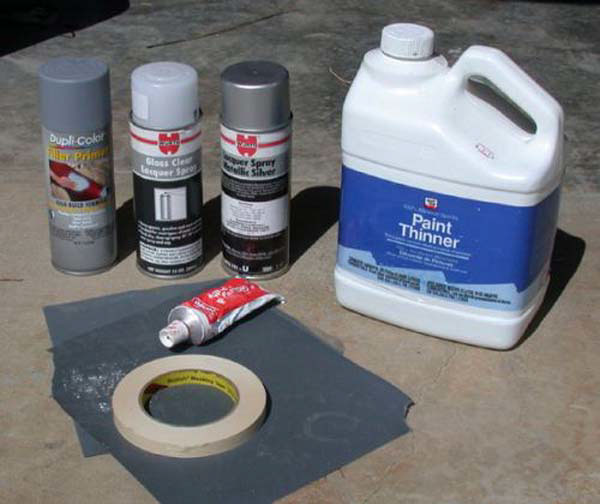
I have a can of scratch-filler primer, the WURTH wheel paint and clear (got mine at Performance Products), some paint thinner, Bondo spot putty (or equivalent), sand paper and some 240 and 400 grit sandpaper (if you are REALLY anal...get some 600 grit).
Step 1. Clean...clean...clean...and did I mention CLEAN!
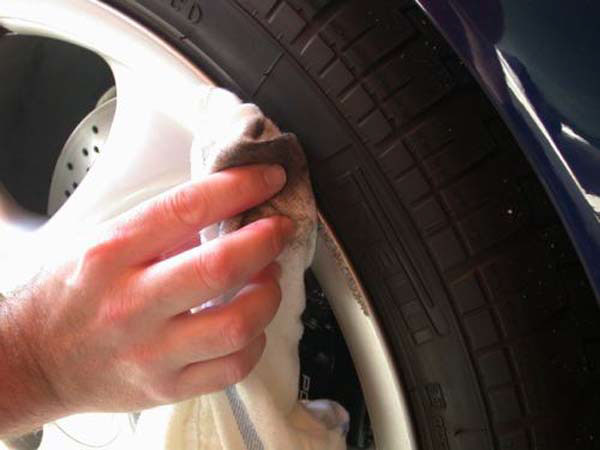
This is one of the most important steps. Use paint thinner to THOROUGHLY clean the ENTIRE area around the damage...you need to get ANY wax or polish or anything off the wheel...I'm going to remind you EVERY step...I probably end up wiping down these surfaces 10 or more times before painting...if you don't do this, the rest is pointless. Also, we want to work ONLY on the area that's damaged...don't go nuts and try to paint half your wheel on the car...for this technique to succeed we want to sand and paint the area only IMMEDIATELY around the damage.
2. Sand and Putty

I like to START by masking the tire from the wheel...get the masking tape WELL behind the rim. Next, sand the area to a nice "feather" with 240 grit sandpaper and wipe some spot putty on. IMPORTANT...this ENTIRE project will work best if the wheel is in the sun and its a nice warm day...the drying time of spot putty is minutes but if it's cold or damp, this project is likely to not work out too well. Remember...keep your sanding to the IMMEDIATE area around the damage. Trust me on this.
So once you've done the first round of putty, switch to the finer of your sandpaper (400 grit in my case) and sand and putty until it FEELS and LOOKS flush. Note that I use the paper wrapped around a piece of wood to make a flat sanding block. It's best to sand with a flat block to get the smoothest finish:

Note that up to this point...including waiting 5 to 10 minutes between coats of putty that the whole project has taken about 40 minutes.

4. Masking and primering:

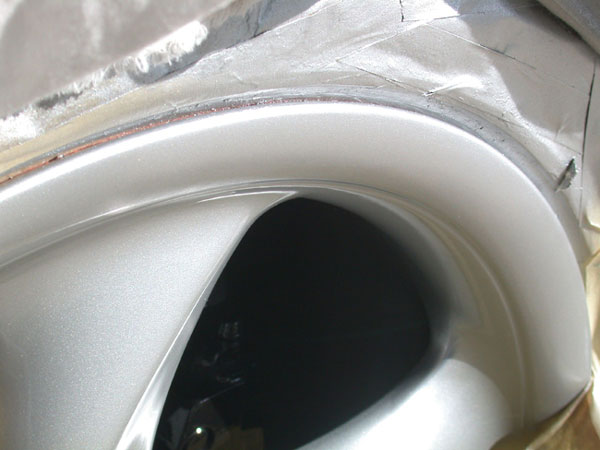
Okay, here's where a bit of laziness is going to create an entire new clay-bar project. This metallic paint will GET EVERYWHERE. I'm talking permanently attached to the fender on the opposite corner of the car...mask CAREFULLY and COVER THE WHOLE CAR with a sheet or equivalent.
I've used the thick scratch-filler primer and sanded it and put a bit more putty on. Note that this is the first place where I use the NASA technique. Immediately after I spray the primer (or paint) I clean ALL the overspray off the spokes of the wheel (clean rag and paint thinner) and the area around the inside of the rim...I do NOT want to try to get paint to smoothly adhere to the entire wheel! We just want to paint the REPAIR. Only the clear coat will be sprayed without wiping off the overspray. Wait for the primer to fully dry and lightly sand it with 400 or 600 grit sandpaper.

5. Painting
VITAL: READ THE CAN...if you try to use this paint in cold temperatures (or in damp conditions) it's going to be a mess...shake the can for a minute at LEAST and push the spray nozzle as you sweep across and release at the end. This is roughly the distance I used the can from the wheel...I HIGHLY recommend painting some scrap something to get used to the distances and thickness this paint sprays.

Now we SHOULD be nearly done BUT (as always) Pete got inpatient and sprayed the clear WAY too soon and lifted the paint and messed it all up. This is NO BIGGIE...take a deep breath, get out your rag and the paint thinner and take it all off. The thinner I used did not eat into the primer so I simply cleaned the wheel (again) and got to respray the silver.
Here's the paint lifting because of the clear being sprayed too soon.

Okay, fast forward a few minutes...I had to roll the car forward a bit to keep it in the sun and I had cleaned (and let fully dry) the wheel and RE-sprayed the silver. Now I'm using the NASA technique on the silver paint and CAREFULLY removing the overspray:

AND here's the nicely painted wheel. I'm going to not be an idiot and let the paint dry OVERNIGHT (like I knew I should) and do the clear coat and I'll post that tomorrow.
Terms of Use | Copyright 1996-2003 by AudiWorld. All rights reserved.
---------------------------------------------------------- END
Ho postato questa guida perch� questo weekend in una trasferta in Umbria il mio povero 1000miglia EVO5 anteriore sx si sono graffiati 5 punti lunghi circa 5mm, a prima vista sono belle piccole strusciate molto leggere. Visto l'entit� del danno vorrei cimentarmi nella riparazione.
La cosa che non mi � chiara � quella pasta rossa che cosa potr� mai essere????
Grazie a tutti.
Tech Article Title Author Date
Home Guide to Wheel Scuff Repair NASA Racer 2002
http://www.audiworld.com/tech/ext43.shtml
Note that although this is a Porsche painted wheel, the WURTH wheel paint (silver) is used for ALL German painted wheels. Same techniques apply for an S4:
Well, there I was...backing into a parking space against a curb and I was in a hurry and I heard it...SCRAPE! One fraction of a second...barely moving. Got out and looked at the rim...OOOOOOWWWWW!
Well, no need to fear...I've done this enough times to have a easy way to do home repairs with a few simple items. Note that this ONLY covers light scuffs, this isn't meant to be used to repair a DAMAGED wheel or one where the scuffs cause significant damage to the rim. This is only for those annoying superficial scuffs like happened to me more times than I care to admit. Now there are PLENTY of GOOD services which can do this for VERY reasonable money...most folks will happily do this but I'm inpatient and have the free time (generally) to spend a couple of hours doing this and it REALLY takes the edge off donking my wheels when I know I can simply fix it myself.
So if you are interested...here's what you need:
I have a can of scratch-filler primer, the WURTH wheel paint and clear (got mine at Performance Products), some paint thinner, Bondo spot putty (or equivalent), sand paper and some 240 and 400 grit sandpaper (if you are REALLY anal...get some 600 grit).
Step 1. Clean...clean...clean...and did I mention CLEAN!
This is one of the most important steps. Use paint thinner to THOROUGHLY clean the ENTIRE area around the damage...you need to get ANY wax or polish or anything off the wheel...I'm going to remind you EVERY step...I probably end up wiping down these surfaces 10 or more times before painting...if you don't do this, the rest is pointless. Also, we want to work ONLY on the area that's damaged...don't go nuts and try to paint half your wheel on the car...for this technique to succeed we want to sand and paint the area only IMMEDIATELY around the damage.
2. Sand and Putty
I like to START by masking the tire from the wheel...get the masking tape WELL behind the rim. Next, sand the area to a nice "feather" with 240 grit sandpaper and wipe some spot putty on. IMPORTANT...this ENTIRE project will work best if the wheel is in the sun and its a nice warm day...the drying time of spot putty is minutes but if it's cold or damp, this project is likely to not work out too well. Remember...keep your sanding to the IMMEDIATE area around the damage. Trust me on this.
So once you've done the first round of putty, switch to the finer of your sandpaper (400 grit in my case) and sand and putty until it FEELS and LOOKS flush. Note that I use the paper wrapped around a piece of wood to make a flat sanding block. It's best to sand with a flat block to get the smoothest finish:
Note that up to this point...including waiting 5 to 10 minutes between coats of putty that the whole project has taken about 40 minutes.
4. Masking and primering:
Okay, here's where a bit of laziness is going to create an entire new clay-bar project. This metallic paint will GET EVERYWHERE. I'm talking permanently attached to the fender on the opposite corner of the car...mask CAREFULLY and COVER THE WHOLE CAR with a sheet or equivalent.
I've used the thick scratch-filler primer and sanded it and put a bit more putty on. Note that this is the first place where I use the NASA technique. Immediately after I spray the primer (or paint) I clean ALL the overspray off the spokes of the wheel (clean rag and paint thinner) and the area around the inside of the rim...I do NOT want to try to get paint to smoothly adhere to the entire wheel! We just want to paint the REPAIR. Only the clear coat will be sprayed without wiping off the overspray. Wait for the primer to fully dry and lightly sand it with 400 or 600 grit sandpaper.
5. Painting
VITAL: READ THE CAN...if you try to use this paint in cold temperatures (or in damp conditions) it's going to be a mess...shake the can for a minute at LEAST and push the spray nozzle as you sweep across and release at the end. This is roughly the distance I used the can from the wheel...I HIGHLY recommend painting some scrap something to get used to the distances and thickness this paint sprays.
Now we SHOULD be nearly done BUT (as always) Pete got inpatient and sprayed the clear WAY too soon and lifted the paint and messed it all up. This is NO BIGGIE...take a deep breath, get out your rag and the paint thinner and take it all off. The thinner I used did not eat into the primer so I simply cleaned the wheel (again) and got to respray the silver.
Here's the paint lifting because of the clear being sprayed too soon.
Okay, fast forward a few minutes...I had to roll the car forward a bit to keep it in the sun and I had cleaned (and let fully dry) the wheel and RE-sprayed the silver. Now I'm using the NASA technique on the silver paint and CAREFULLY removing the overspray:
AND here's the nicely painted wheel. I'm going to not be an idiot and let the paint dry OVERNIGHT (like I knew I should) and do the clear coat and I'll post that tomorrow.
Terms of Use | Copyright 1996-2003 by AudiWorld. All rights reserved.
---------------------------------------------------------- END
Ho postato questa guida perch� questo weekend in una trasferta in Umbria il mio povero 1000miglia EVO5 anteriore sx si sono graffiati 5 punti lunghi circa 5mm, a prima vista sono belle piccole strusciate molto leggere. Visto l'entit� del danno vorrei cimentarmi nella riparazione.
La cosa che non mi � chiara � quella pasta rossa
che cosa potr� mai essere???? Grazie a tutti.


 ...un 3.8 PORSCHE ci sta bene!!

Commenta